


前言
哪吒监控 V1,一个开源、轻量、易用的服务器监控与运维工具,也是目前最多人用的探针之一了。哪吒从V0升级V1后,很多人不习惯安装逻辑,这次就手把手教大家来做。哪吒有着高度的定制化,只要有能力,可以把探针玩得非常好看。
本次安装环境:Debian12。
并开启了agent的tls和真实 IP 请求头,加强了防护。
项目地址
官方GitHub地址:https://github.com/nezhahq/nezha
特点:
一键安装:支持一键安装面板和监控服务,操作便捷。兼容主流系统,包括 Linux、Windows、macOS、OpenWRT 以及群晖。
实时监控:支持同时监控多个服务器的状态,提供历史网络状态和延迟图表,监控网页、端口可用性和 SSL 证书状态。
灵活通知:支持故障和流量等状态告警,可通过 Telegram、邮件、微信等多种方式提醒。
轻松运维:提供 API 获取服务器状态,支持WebSSH、DDNS 和流量监控。
方便操作:可设置定时和触发任务,并批量执行服务器任务。
官方Demo:
用户前台

管理后台

搭建方式
准备工作
搭建哪吒监控的 Dashboard,你需要:
一台可以连接公网的服务器。防火墙和安全策略需放行 8008 端口,否则无法访问或接收数据。单核 512MB 内存的服务器即可满足大多数使用场景。
一个已设置好 A 记录,指向 Dashboard 服务器 IP 的域名。
TIP
如果你想使用 CDN,请准备两个域名:
一个配置好 CDN,用作公开访问,CDN 需支持 WebSocket 协议;
另一个域名不使用 CDN,用作 Agent 与 Dashboard 的通信。
尽管 V1 版本不再区分访问端口和通信端口,但由于不同厂商的 CDN 配置可能导致通信异常,仅建议按上述方式准备域名(非强制要求)。
本文档以 "dashboard.example.com" 和 "data.example.com" 为例。
CF开启WebSocket和gRPC
必须在CF开启WebSocket和gRPC,否则Agent会无法连接

登录CF,https://dash.cloudflare.com/
选择你解析的域名
左侧找到
网络打开
WebSockets和gRPC
安装Docker
安装 Dashboard可以本地独立安装和使用Docker安装,建议使用Docker安装Dashboard。如本地独立安装则跳过安装Docker。
wget -qO- get.docker.com | bash

docker -v     #查看版本

systemctl enable docker     #开机启动
在服务器中安装 Dashboard
在面板服务器中,运行以下安装脚本:
curl -L https://raw.githubusercontent.com/nezhahq/scripts/refs/heads/main/install.sh -o nezha.sh && chmod +x nezha.sh && sudo ./nezha.sh服务器位于中国大陆,可以使用镜像:
curl -L https://gitee.com/naibahq/scripts/raw/main/install.sh -o nezha.sh && chmod +x nezha.sh && sudo CN=true ./nezha.sh以 Docker 安装为例,安装完成后按提示输入以下信息:
安装面板端请输入站点标题: - 自定义站点标题(如Tanzhen)。请输入暴露端口: - 公开访问端口(默认 8008,可自定义)。预设的 nezha-agent 连接地址:不使用CDN的域名,如果域名是example.com,则输入example.com:8008(端口依据上一步)是否希望通过 TLS 连接 Agent:不懂的话,建议默认直接回车请指定后台语言: - 选择语言偏好,如中文(简体)选择1。
输入完成后,等待拉取 Docker 镜像。安装结束后,如果一切正常,你可以通过域名和端口号访问 Dashboard,例如:
http://dashboard.example.com:8008
如果需要再次运行安装脚本,可输入以下命令:
./nezha.sh打开管理脚本。
反向代理
从 V1 版本开始,不再区分 Dashboard 和 gRPC 端口,访问与通信均通过默认的 8008 端口。
官方有给出Nginx和Caddy的配置示例,小白建议用Caddy,Caddy的反代配置非常简单,Nginx会有一定难度,需要一定的基础。
Caddy反代
安装Caddy
Caddy官网安装教程:点击打开,找到自己对应系统的安装方式,如Debian, Ubuntu, Raspbian适用的:
sudo apt install -y debian-keyring debian-archive-keyring apt-transport-https curl
curl -1sLf 'https://dl.cloudsmith.io/public/caddy/stable/gpg.key' | sudo gpg --dearmor -o /usr/share/keyrings/caddy-stable-archive-keyring.gpg
curl -1sLf 'https://dl.cloudsmith.io/public/caddy/stable/debian.deb.txt' | sudo tee /etc/apt/sources.list.d/caddy-stable.list
chmod o+r /usr/share/keyrings/caddy-stable-archive-keyring.gpg
chmod o+r /etc/apt/sources.list.d/caddy-stable.list
sudo apt update
sudo apt install caddy
等待安装完成,在浏览器输入你的域名,会显示:

到此Caddy安装成功。
配置Caddy
哪吒官方Caddy 配置示例
dashboard.example.com {
    @grpcProto {
        path /proto.NezhaService/*
    }

    reverse_proxy @grpcProto {
        header_up Host {host}
        header_up nz-realip {http.CF-Connecting-IP} # 替换为你的 CDN 提供的私有 header,此处为 CloudFlare 默认
        # header_up nz-realip {remote_host} # 如果你使用caddy作为最外层,就把上面一行注释掉,启用此行
        transport http {
            versions h2c
            read_buffer 4096
        }
        to localhost:8008
    }

    reverse_proxy {
        header_up Host {host}
        header_up Origin https://{host}
        header_up nz-realip {http.CF-Connecting-IP} # 替换为你的 CDN 提供的私有 header,此处为 CloudFlare 默认
        # header_up nz-realip {remote_host} # 如果你使用caddy作为最外层,就把上面一行注释掉,启用此行
        transport http {
            read_buffer 16384
        }
        to localhost:8008
    }
}
可以先复制出来到别的地方修改,需要修改的地方很少。
把
dashboard.example.com换成你服务器域名在安装Dashboard时,如果修改了
暴露端口,把两处8008修改成实际的端口,未修改暴露端口则不用动
打开Caddy的配置文件:
nano /etc/caddy/Caddyfile把修改好的配置信息粘贴到最后去,然后Ctrl+x确认保存并退出。
重启Caddy:
systemctl reload caddy验证反代
进入用户前台
在浏览器输入服务器域名即可进入哪吒监控的用户前台

网站证书

可以看到已经颁发了时效3个月的证书,并且Caddy会自动续签证书,不用手动续签证书,对小白非常友好。
配置Nginx
哪吒官方Nginx 配置示例
server {
    listen 443 ssl http2;
    listen [::]:443 ssl http2;
    # http2 on; # Nginx > 1.25.1,请注释上面两行,启用此行

    server_name dashboard.example.com; # 替换为你的域名
    ssl_certificate          /data/letsencrypt/fullchain.pem; # 域名证书路径
    ssl_certificate_key      /data/letsencrypt/key.pem;       # 域名私钥路径
    ssl_stapling on;
    ssl_session_timeout 1d;
    ssl_session_cache shared:SSL:10m; # 如果与其他配置冲突,请注释此项
    ssl_protocols TLSv1.2 TLSv1.3;

    underscores_in_headers on;
    set_real_ip_from 0.0.0.0/0; # 替换为你的 CDN 回源 IP 地址段
    real_ip_header CF-Connecting-IP; # 替换为你的 CDN 提供的私有 header,此处为 CloudFlare 默认
    # 如果你使用nginx作为最外层,把上面两行注释掉

    # grpc 相关
    location ^~ /proto.NezhaService/ {
        grpc_set_header Host $host;
        grpc_set_header nz-realip $http_CF_Connecting_IP; # 替换为你的 CDN 提供的私有 header,此处为 CloudFlare 默认
        # grpc_set_header nz-realip $remote_addr; # 如果你使用nginx作为最外层,就把上面一行注释掉,启用此行
        grpc_read_timeout 600s;
        grpc_send_timeout 600s;
        grpc_socket_keepalive on;
        client_max_body_size 10m;
        grpc_buffer_size 4m;
        grpc_pass grpc://dashboard;
    }
    # websocket 相关
    location ~* ^/api/v1/ws/(server|terminal|file)(.*)$ {
        proxy_set_header Host $host;
        proxy_set_header nz-realip $http_cf_connecting_ip; # 替换为你的 CDN 提供的私有 header,此处为 CloudFlare 默认
        # proxy_set_header nz-realip $remote_addr; # 如果你使用nginx作为最外层,就把上面一行注释掉,启用此行
        proxy_set_header Origin https://$host;
        proxy_set_header Upgrade $http_upgrade;
        proxy_set_header Connection "upgrade";
        proxy_read_timeout 3600s;
        proxy_send_timeout 3600s;
        proxy_pass http://127.0.0.1:8008;
    }
    # web
    location / {
        proxy_set_header Host $host;
        proxy_set_header nz-realip $http_cf_connecting_ip; # 替换为你的 CDN 提供的私有 header,此处为 CloudFlare 默认
        # proxy_set_header nz-realip $remote_addr; # 如果你使用nginx作为最外层,就把上面一行注释掉,启用此行
        proxy_read_timeout 3600s;
        proxy_send_timeout 3600s;
        proxy_buffer_size 128k;
        proxy_buffers 4 256k;
        proxy_busy_buffers_size 256k;
        proxy_max_temp_file_size 0;
        # proxy_set_header X-Forwarded-Proto $scheme; # 如果你使用nginx作为最外层,就启用此行避免无法正确读取访问的协议
        proxy_pass http://127.0.0.1:8008;
    }
}

upstream dashboard {
    server 127.0.0.1:8008;
    keepalive 512;
}
申请SSL证书
这里使用acme.sh申请a.com的SSL证书,Webroot模式
原理是acme.sh会在网站对应域名的webroot目录下生成域名验证文件, 然后通过公网访问之,以验证对域名的所有权
面板机上安装acme.sh
curl https://get.acme.sh | sh -s [email protected]切换CA机构
acme.sh --set-default-ca --server letsencrypt申请证书,按实际情况修改面板域名
acme.sh --issue -d a.com -k ec-256 --webroot /var/www/html安装证书,按实际情况修改面板域名和证书路径
acme.sh --install-cert -d a.com --ecc --key-file /etc/nezha/server.key --fullchain-file /etc/nezha/server.crt --reloadcmd "systemctl force-reload nginx"账户安全管理
登录后台

默认用户名:admin
默认密码:admin
登录后请第一时间修改!!!
默认用户名和密码很简单,容易被扫出来,存在很大的安全隐患,很多人未修改账户密码,导致被侵入系统!!!
为了数据的安全,登录后请第一时间修改!!!
修改账户密码


按照步骤,到更新个人资料页面,修改用户名和密码后,点击确认即可。
设置 OAuth 2.0 绑定(加强项)
使用此功能前首先需要在第三方网站上创建一个 OAuth 2.0 应用。
哪吒的 Callback URI 为:/api/v1/oauth2/callback
由于各个网站的步骤不同,这里只能给出部分示例,一般来说各个平台的操作类似,只需要获取到哪吒所需的信息即可。
创建 OAuth 2.0 应用
以Github示例:
1、打开 https://github.com/settings/developers,依次选择 “OAuth Apps” - “New OAuth App”。
2、填写以下需要的字段:
Application name:应用名,随意起,例如TanzhenHomepage URL:面板访问地址,例如https://nezha.example.comAuthorization callback URL面板的 Callback 地址,这里只检测前缀,所以可以填写https://nezha.example.com/api/v1/oauth2/callback。
3、然后点击下方的Register application按钮完成创建。
4、在新页面中保存 Client ID 和 Client secrets

点击Generate a new client secret得到Client secrets

记录好Client ID 和 Client secrets, Client secrets只显示一次,忘记的话要新建 Client secrets。
绑定账户
回到服务器,输入:
nano /opt/nezha/dashboard/data/config.yaml把OAuth 2.0 配置放到最后:
oauth2:
  GitHub:
    client_id: "a-unique-id"
    client_secret: "a-unique-secret"
    endpoint:
      auth_url: "https://github.com/login/oauth/authorize"
      token_url: "https://github.com/login/oauth/access_token"
    user_info_url: "https://api.github.com/user"
    user_id_path: "id"
把
a-unique-id换成你的Client ID把
a-unique-secret换成你的Client secretsCtrl+x确认保存并退出
运行脚本:
./nezha.sh选择重启面板。
在配置好 OAuth 2.0 信息后,登录后台,点击右上角头像进入个人设置。

在个人信息页的卡片列表里可以看见 OAuth 2 绑定的字样,其中有您所填写的 OAuth 2.0 配置名及其对应用户。点击配置名右侧的 Bind 按钮就可以跳转到认证页面进行账户绑定。

绑定后如图所示。

完成绑定后,便可以使用登录页下方的 OAuth 2 按钮登录您的账户。
禁止密码登录
在更新个人信息的表单中可以为当前用户启用该选项。

启用后,将无法通过密码登录当前用户,与验证失败的错误一致,只能通过OAuth 2.0登录,大大增加了管理后台的安全性。
如果当前用户还没有任何 OAuth 2.0 绑定关系,则无法启用该选项;相应地,如果启用了该选项,当前用户只剩下一个 OAuth 2.0 绑定关系时将无法删除此绑定关系。
真实 IP 请求头
由于 V1 版本引入了本地账户机制,为防止外界暴力破解登录接口(Web 应用防火墙功能),程序需要准确获取客户端的真实 IP 地址。
此功能可通过路径 /dashboard/settings/waf 进行管理配置。
真实 IP 请求头功能,看自己需求是否开启。本教程默认开启,也建议大家都开启。
配置场景
根据服务部署方式的不同,有以下两种配置场景:
1. 直接将面板服务映射至公网
勾选
使用直连 IP即可,无需额外配置。
2. 使用 Web 容器反向代理或 CDN(本教程使用此方法)
参考上面的反代,也可以参考官方 反向代理配置 文档。
在示例配置中,使用了
nz-realip请求头,您可以沿用或修改为其他自定义值。确保代理服务器正确设置请求头,并将客户端 IP 地址通过自定义头部传递给 Dashboard。
Caddy反代
如果按照教程上方Caddy的配置,直接在管理后台-点击头像-系统设置-真实IP请求头

填写CF-Connecting-IP,保存即可。
Nginx反代
Nginx 1.25.1 版本及以下
server {
    listen 443 ssl http2;
    listen [::]:443 ssl http2;
    server_name dashboard.example.com;
    ssl_certificate          /etc/nginx/ssl/dashboard.example.com.pem;
    ssl_certificate_key      /etc/nginx/ssl/dashboard.example.com.key;
    ssl_stapling on;
    ssl_session_timeout 1d;
    ssl_session_cache shared:SSL:10m;
    ssl_protocols TLSv1.2 TLSv1.3;

    underscores_in_headers on;
    set_real_ip_from 103.21.244.0/22;
    set_real_ip_from 103.22.200.0/22;
    set_real_ip_from 103.31.4.0/22;
    set_real_ip_from 104.16.0.0/13;
	set_real_ip_from 104.24.0.0/14;
    set_real_ip_from 108.162.192.0/18;
    set_real_ip_from 131.0.72.0/22;
    set_real_ip_from 141.101.64.0/18;
    set_real_ip_from 162.158.0.0/15;
    set_real_ip_from 172.64.0.0/13;
    set_real_ip_from 173.245.48.0/20;
    set_real_ip_from 188.114.96.0/20;
    set_real_ip_from 190.93.240.0/20;
    set_real_ip_from 197.234.240.0/22;
    set_real_ip_from 198.41.128.0/17;
    set_real_ip_from 2400:cb00::/32;
    set_real_ip_from 2606:4700::/32;
    set_real_ip_from 2803:f800::/32;
    set_real_ip_from 2405:b500::/32;
    set_real_ip_from 2405:8100::/32;
    set_real_ip_from 2a06:98c0::/29;
    set_real_ip_from 2c0f:f248::/32;
    real_ip_header CF-Connecting-IP;

    location ^~ /proto.NezhaService/ {
        grpc_set_header Host $host;
        grpc_set_header nz-realip $http_CF_Connecting_IP;
        grpc_read_timeout 600s;
        grpc_send_timeout 600s;
        grpc_socket_keepalive on;
        client_max_body_size 10m;
        grpc_buffer_size 4m;
        grpc_pass grpc://dashboard;
    }
    location ~* ^/api/v1/ws/(server|terminal|file)(.*)$ {
        proxy_set_header Host $host;
        proxy_set_header nz-realip $http_cf_connecting_ip;
        proxy_set_header Origin https://$host;
        proxy_set_header Upgrade $http_upgrade;
        proxy_set_header Connection "upgrade";
        proxy_read_timeout 3600s;
        proxy_send_timeout 3600s;
        proxy_pass http://127.0.0.1:8008;
    }
    location / {
        proxy_set_header Host $host;
        proxy_set_header Origin https://$host;
        proxy_set_header nz-realip $http_cf_connecting_ip;
        proxy_read_timeout 3600s;
        proxy_send_timeout 3600s;
        proxy_buffer_size 128k;
        proxy_buffers 4 256k;
        proxy_busy_buffers_size 256k;
        proxy_max_temp_file_size 0;
        proxy_pass http://127.0.0.1:8008;
    }
}

upstream dashboard {
    server 127.0.0.1:8008;
    keepalive 512;
}
Nginx 1.25.1 版本以上
server {
    listen 443 ssl;
    listen [::]:443 ssl;
	 http2 on;
    server_name dashboard.example.com;
    ssl_certificate          /etc/nginx/ssl/dashboard.example.com.pem;
    ssl_certificate_key      /etc/nginx/ssl/dashboard.example.com.key;
    ssl_stapling on;
    ssl_session_timeout 1d;
    ssl_session_cache shared:SSL:10m;
    ssl_protocols TLSv1.2 TLSv1.3;

    underscores_in_headers on;
    set_real_ip_from 103.21.244.0/22;
    set_real_ip_from 103.22.200.0/22;
    set_real_ip_from 103.31.4.0/22;
    set_real_ip_from 104.16.0.0/13;
	set_real_ip_from 104.24.0.0/14;
    set_real_ip_from 108.162.192.0/18;
    set_real_ip_from 131.0.72.0/22;
    set_real_ip_from 141.101.64.0/18;
    set_real_ip_from 162.158.0.0/15;
    set_real_ip_from 172.64.0.0/13;
    set_real_ip_from 173.245.48.0/20;
    set_real_ip_from 188.114.96.0/20;
    set_real_ip_from 190.93.240.0/20;
    set_real_ip_from 197.234.240.0/22;
    set_real_ip_from 198.41.128.0/17;
    set_real_ip_from 2400:cb00::/32;
    set_real_ip_from 2606:4700::/32;
    set_real_ip_from 2803:f800::/32;
    set_real_ip_from 2405:b500::/32;
    set_real_ip_from 2405:8100::/32;
    set_real_ip_from 2a06:98c0::/29;
    set_real_ip_from 2c0f:f248::/32;
    real_ip_header CF-Connecting-IP;

    location ^~ /proto.NezhaService/ {
        grpc_set_header Host $host;
        grpc_set_header nz-realip $http_CF_Connecting_IP;
        grpc_read_timeout 600s;
        grpc_send_timeout 600s;
        grpc_socket_keepalive on;
        client_max_body_size 10m;
        grpc_buffer_size 4m;
        grpc_pass grpc://dashboard;
    }
    location ~* ^/api/v1/ws/(server|terminal|file)(.*)$ {
        proxy_set_header Host $host;
        proxy_set_header nz-realip $http_cf_connecting_ip;
        proxy_set_header Origin https://$host;
        proxy_set_header Upgrade $http_upgrade;
        proxy_set_header Connection "upgrade";
        proxy_read_timeout 3600s;
        proxy_send_timeout 3600s;
        proxy_pass http://127.0.0.1:8008;
    }
    location / {
        proxy_set_header Host $host;
        proxy_set_header Origin https://$host;
        proxy_set_header nz-realip $http_cf_connecting_ip;
        proxy_read_timeout 3600s;
        proxy_send_timeout 3600s;
        proxy_buffer_size 128k;
        proxy_buffers 4 256k;
        proxy_busy_buffers_size 256k;
        proxy_max_temp_file_size 0;
        proxy_pass http://127.0.0.1:8008;
    }
}

upstream dashboard {
    server 127.0.0.1:8008;
    keepalive 512;
}
CF CDN
打开CF小黄云
CF WAF
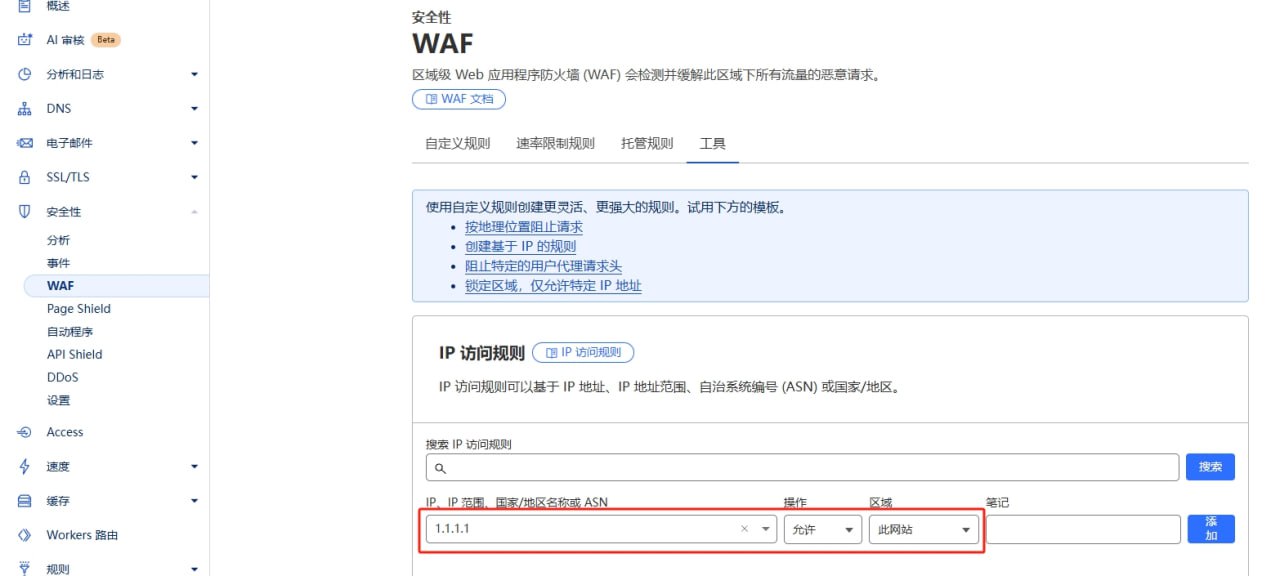
添加你的主控端IP为允许,添加你的被控端IP为允许,其他WAF就可以正常设置不影响主被控通讯了。
后台设置
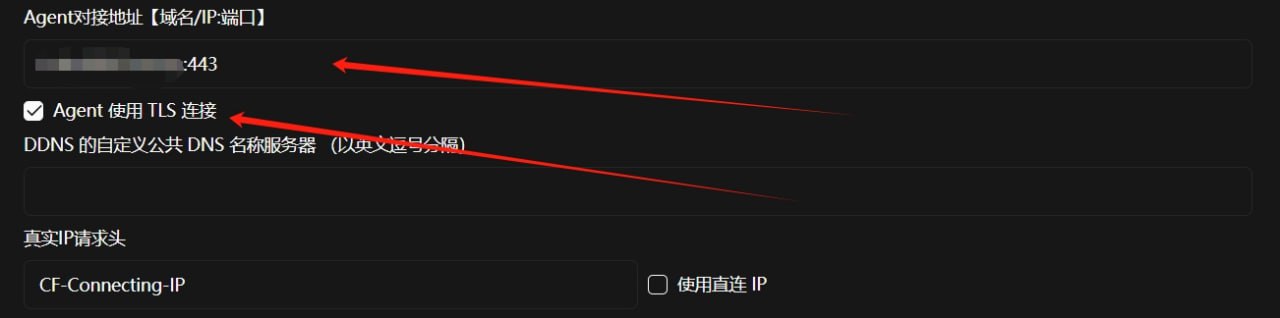
Agent对接地址:填写域名:443
Agent 使用 TLS 连接:勾选Agent 使用 TLS 连接,必须勾上,不然Agent(客户端)无法链接
通过以上操作,同时开启了真实 IP 请求头以及Agent(客户端)的TLS链接。
通知设置
哪吒监控支持对服务器的负载、CPU、内存、硬盘、流量、月流量、进程数和连接数进行监控,并在达到用户设定的阈值时发送通知。
哪吒有比较多的通知方式,这里以TGbot示例,其他通知方式可以查看哪吒的官方文档。
获取 URL 参数
获取机器人 Token:与 @BotFather 对话,发送
/newbot创建新机器人,获取 Token。获取用户 ID:与 @userinfobot 对话,获取你的用户 ID。
与机器人对话:先与新创建的机器人发送一条消息,确保机器人可以发送消息给你。
通知配置
新建通知
进入管理后台,找到通知-通知-右上角+号新建

名称:随意,例如
TGURL:
https://api.telegram.org/bot<你的机器人Token>/sendMessage?chat_id=<你的用户ID>&text=#NEZHA#请求方式:
GET请求类型:默认
Body:空
注意:将 <你的机器人Token> 和 <你的用户ID> 替换为实际值。
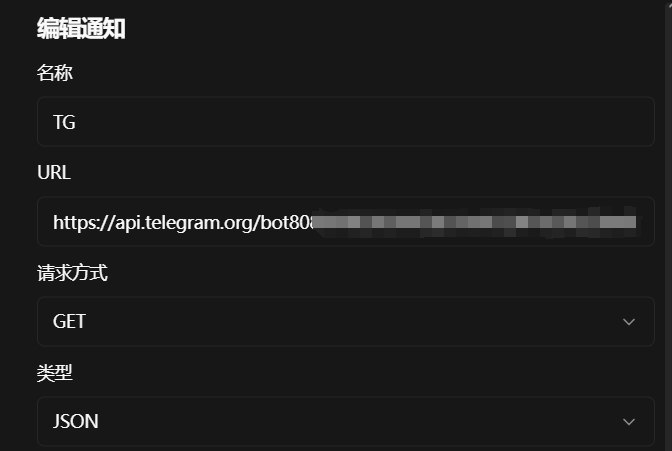
写名称和URL,其他看你需求或者直接不用管,下拉确认。
新增通知组
进入管理后台,找到分组-服务器-右上角+号新建
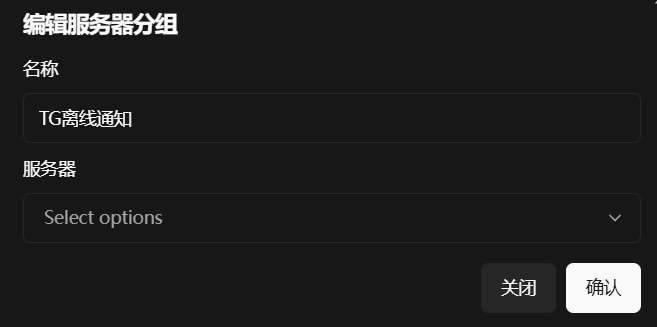
名称:随意,例如TG离线通知服务器:是指哪个服务器分组到TG离线通知这个组,正常默认全部
新增通知组通知
进入管理后台,找到分组-通知-右上角+号新建
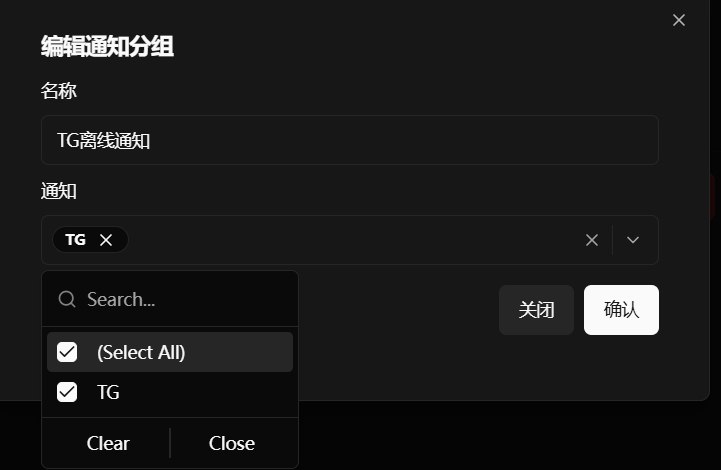
名称:随意,例如TG离线通知通知:选择刚才新建的通知TG
新建通知规则
只展示离线通知,其他通知方式可以查看哪吒的官方文档
管理后台,找到通知-报警规则-右上角+号新建
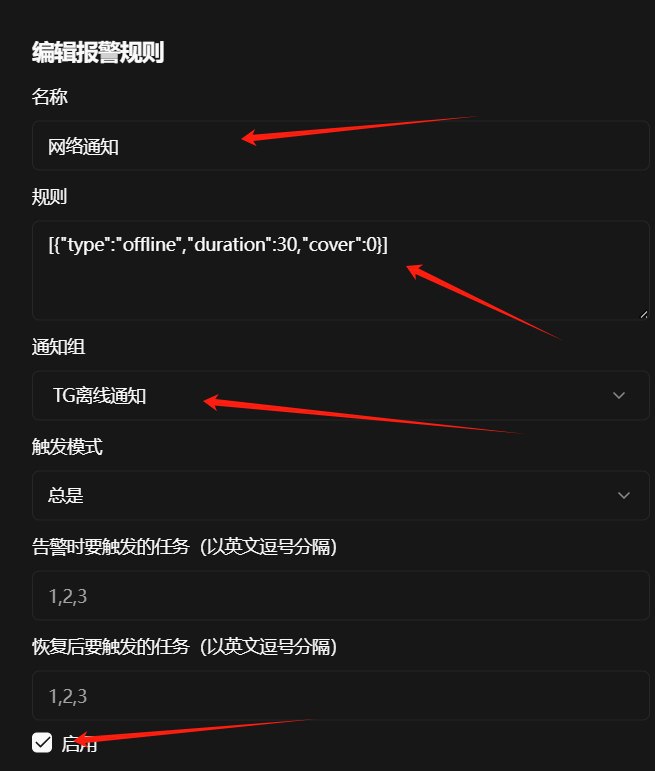
名称:随意,例如网络通知规则:[{"type":"offline","duration":30,"cover":0}],意思是监控监控所有服务器,服务器离线30秒后,发送TG通知。如果想要某个服务器不通知,可通过ignore忽略特定服务器,如:[{"type":"offline","duration":30,"cover":0, "ignore": {"1": true, "2": true}}],这样代表着你的1号、2号服务器离线后不发送TG通知通知组:选择刚才新增的通知组,例如TG离线通知启用:勾选启用,然后确认
新增服务器
一键安装步骤

在
服务器页面中,点击安装命令并选择对应操作系统,安装命令将自动复制到你的剪贴板。在被控端服务器中运行安装命令,等待安装完成后返回到
服务器页面查看是否上线。如果安装成功,页面中将自动弹出新的服务器,你可以点击编辑按钮为其设置名称。
用户前台
管理后台

新Agent的名称是随机生成,在管理后台修改信息
手动安装
下载agent
在/opt中新建nezha文件,在/opt/nezha中新建agent文件夹
sudo mkdir -p /opt/nezha/agent进入/opt/nezha/agent/路径
cd /opt/nezha/agent/到官方GitHub下载自己合适的Agent,例如我的是amd64架构的,对应的是nezha-agent_linux_amd64.zip,鼠标右键复制链接地址
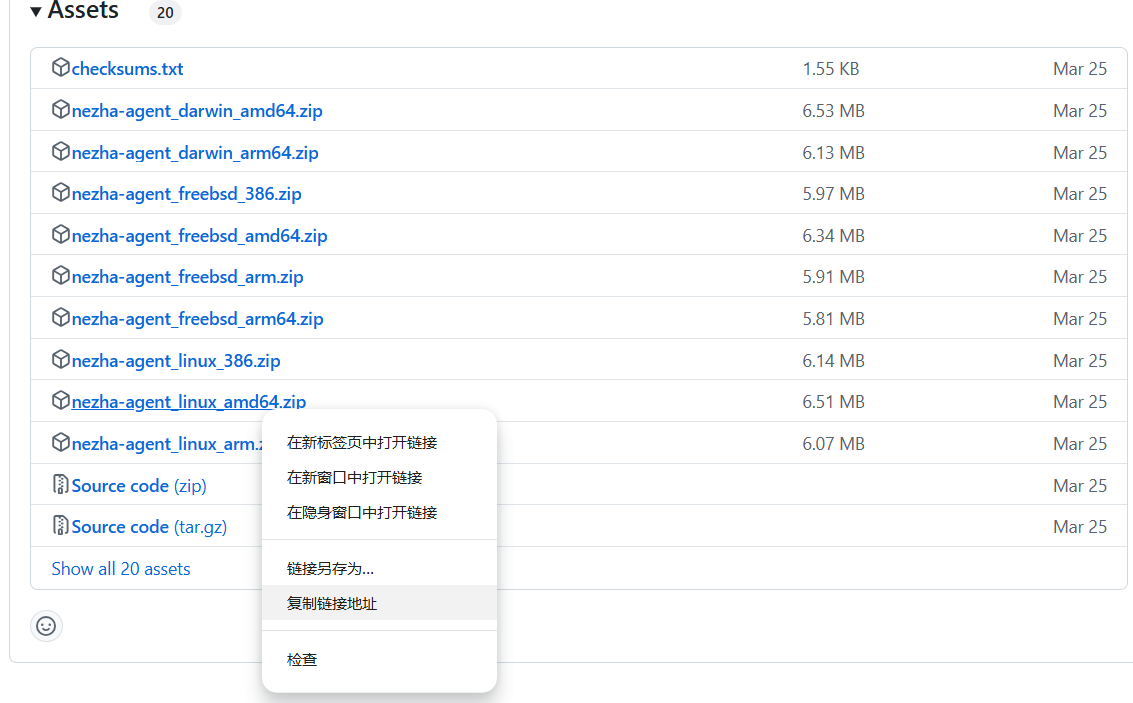
使用wget 刚才复制的链接下载agent,下方是示例
wget https://github.com/nezhahq/agent/releases/download/v1.10.0/nezha-agent_linux_amd64.zip解压agent
unzip nezha-agent_linux_amd64.zip没安装unzip的话,需要安装
apt install unzip此时nezha-agent_linux_amd64.zip已经没用了,不想要可以删掉
sudo rm nezha-agent_linux_amd64.zip配置agent的配置文件config.yml
配置文件config.yml同样在/opt/nezha/agent/中,进入对应路径
cd /opt/nezha/agent/config.yml的准备
修改下方内容,把修改好的内容复制粘贴到config.yml中
client_secret: 你的client_secret
debug: false
disable_auto_update: false
disable_command_execute: false
disable_force_update: false
disable_nat: false
disable_send_query: false
gpu: false
insecure_tls: false
ip_report_period: 1800
report_delay: 3
self_update_period: 0
server: 连接地址:端口
skip_connection_count: false
skip_procs_count: false
temperature: false
tls: true
use_gitee_to_upgrade: false
use_ipv6_country_code: false
uuid: 随便生成一个uuid
有3个地方是需要修改的
client_secret:改成你的client_secret,不知道在哪的话,就找一键安装命令,安装命令里面有
server:探针的域名:443,例如example.com:443
tls:因为本次是开启了agent的tls和真实IP请求头,所以必须是
trueuuid:随便生成一个uuid(可在uuidgenerator获取一个随机uuid)
配置config.yml
nano config.yml把上面修改好的内容粘贴进去,然后ctrl+x确认保存并退出。
赋予权限启动
cdchmod +x /opt/nezha/agent/nezha-agent/opt/nezha/agent/nezha-agent -c /opt/nezha/agent/config.yml #这步可能会卡住不动,如果看到agent上线可ctrl+c下一步Agent开机启动
nano /etc/systemd/system/nezha-agent.service把下面内容复制粘贴进去
[Unit]
Description=哪吒监控 Agent
ConditionFileIsExecutable=/opt/nezha/agent/nezha-agent


[Service]
StartLimitInterval=5
StartLimitBurst=10
ExecStart=/opt/nezha/agent/nezha-agent "-c" "/opt/nezha/agent/config.yml"

WorkingDirectory=/opt/nezha/agent


Restart=always

RestartSec=30
EnvironmentFile=-/etc/sysconfig/nezha-agent

[Install]
WantedBy=multi-user.target然后ctrl+x确认保存并退出。
chmod +x /etc/systemd/system/nezha-agent.servicesudo systemctl daemon-reloadsudo systemctl enable nezha-agentsudo systemctl start nezha-agent更多手动安装示例可以参考官方文档:https://nezha.wiki/guide/agent.html
卸载
卸载 Agent 包括停止服务、卸载服务,以及删除相关文件。
停止并卸载服务
cd /opt/nezha/agent/
./nezha-agent service uninstall
删除 Agent 文件夹
rm -rf /opt/nezha/agent/如果安装了多个服务并想要全部卸载,可以使用 Agent 安装脚本的卸载功能
./agent.sh uninstall注意事项
关网页SSH
强烈建议关掉nezha的网页SSH功能。万一被人爆破进后台,他人就有了控制你服务器的功能,已经有很多案例贪图方便用nezha的网页SSH或忘记关掉此功能,被他人爆破扫描进后台,利用服务器发包、种马、挖矿等等。我们不应该给自己留这种安全隐患。
我们要修改agent的config.yml文件
nano /opt/nezha/agent/config.yml找到disable_command_execute,把false改成true,然后ctrl+x确认保存并退出。
重启agent生效
sudo systemctl restart nezha-agent.service不重启不生效。
更多agent的配置文件信息,参考官方文档:https://nezha.wiki/configuration/agent.html。
同时显示多个agent
安装agent时,同一台机器前端和后台出现多个agent,并且删除后也会自动添加。是因为有多个agent造成的,需要在被监控端卸载agent和后台删除才行。这里主要说被监控机器上卸载agent,参考上方的卸载agent操作。如还有,是因为没有卸载干净造成,可以看被监控端正在运行的服务,卸载多余的agent。
查看正在运行的服务
systemctl list-units --type=service美化
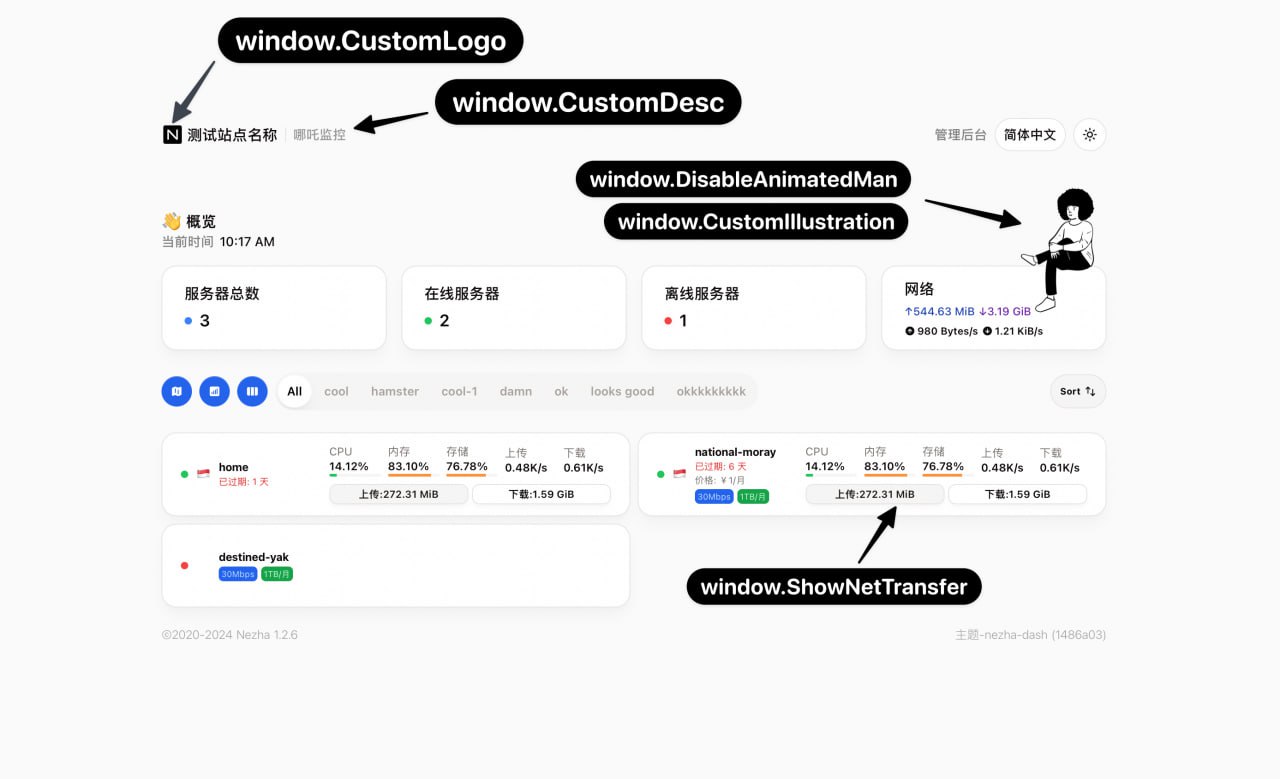
V1 中的自定义代码。
| 🏷️ 变量名 | 📖 功能说明 | 🧪 示例值 |
|---|---|---|
| window.CustomBackgroundImage | 设置自定义背景图 | https://example.com/bg.jpg |
| window.CustomMobileBackgroundImage | 设置手机端专属背景图 | https://example.com/mobile-bg.jpg |
| window.CustomLogo | 页面顶部 Logo 地址 | https://example.com/logo.png |
| window.CustomDesc | 页面描述文本 | 欢迎访问监控面板 |
| window.ShowNetTransfer | 显示卡片上下行流量 | true |
| window.DisableAnimatedMan | 关闭动画人物插图 | true |
| window.CustomIllustration | 自定义插图(如使用请移除上方 DisableAnimatedMan) | https://example.com/image.svg |
| window.FixedTopServerName | 顶部固定显示服务器名 | true |
| window.CustomLinks | 设置页面外部链接按钮 | [{"link":"https://github.com/hamster1963/nezha-dash","name":"GitHub"}] |
| window.ForceTheme | 强制主题色模式 | light / dark |
| window.ForceUseSvgFlag | 使用 SVG 国旗图标 | true |
| window.ForceShowServices | 强制显示服务状态卡片 | true |
| window.ForceShowMap | 强制显示服务器位置地图 | true |
| window.ForceCardInline | 列表单行显示 | true |
| window.ForcePeakCutEnabled | 开启网络延迟图表削峰功能 | true |
外部链接格式
原始 json 格式:
[
  { "link": "https://github.com/hamster1963/nezha-dash", "name": "GitHub" },
  { "link": "https://buycoffee.top/coffee", "name": "Buycoffee☕️" }
]
需要对 json 进行转义,然后填入环境变量中。
可通过 https://www.jsont.run 转义:
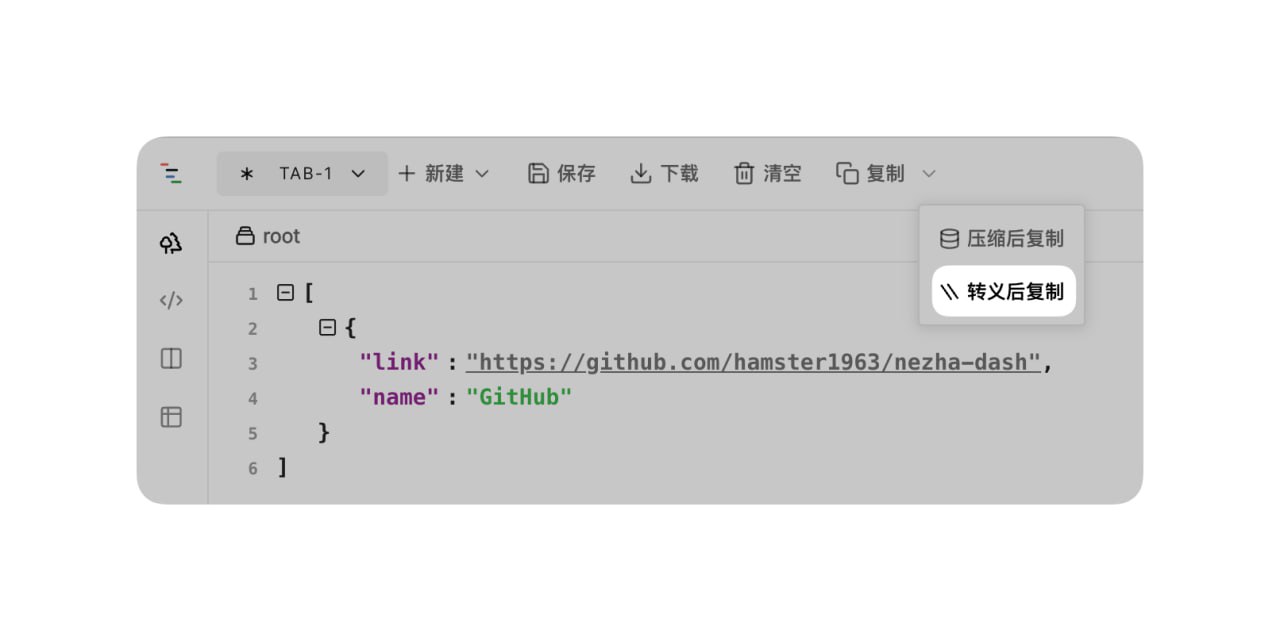
转换结果如下:
[{\"link\":\"https://github.com/hamster1963/nezha-dash\",\"name\":\"GitHub\"}]填写示例
<script>
  window.CustomBackgroundImage = 'https://....png'
  window.CustomMobileBackgroundImage = 'https://....png'
  window.CustomLogo = 'https://....png'
  window.CustomDesc = '这是一个自定义描述'
  window.ShowNetTransfer = true
  window.DisableAnimatedMan = false
  window.CustomIllustration = 'https://....png'
  window.FixedTopServerName = true
  window.CustomLinks =
    '[{"link":"https://github.com/hamster1963/nezha-dash","name":"GitHub"}]'
  window.ForceTheme = 'light'
</script>
需要什么功能,自己添加到管理后台的自定义代码
我自用的自定义代码
自定义代码(样式和脚本)
<script>
  window.CustomBackgroundImage = 'https://ice.frostsky.com/2024/12/19/19796f3dc9e6fad6d49752f44e183d17.jpeg'
  window.ShowNetTransfer = true
  window.DisableAnimatedMan = "true"
  window.ForceTheme = 'dark'
  window.ForceUseSvgFlag = true
</script>
分别是:
自定义背景
前台显示卡片上下行流量
关闭前台动漫人物
强制主题黑夜模式
强制使用 SVG 旗帜
仪表板的自定义代码
<script>
  window.DisableAnimatedMan = "true"
</script>
关闭管理后台动漫人物
Agent公开备注设置
哪吒监控支持在 Dashboard 设置自定义的公开信息,用于前端自定义。
官方示例配置(默认主题)
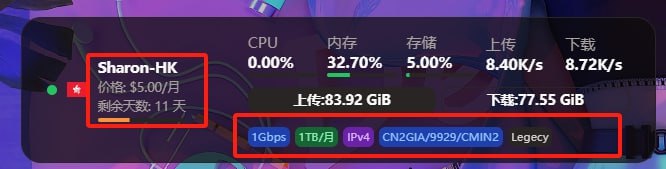
以下是管理后台-服务器-设置某个服务器-公开备注的 JSON 配置示例:
{
  "billingDataMod": {
    "startDate": "2024-12-08T12:58:17.636Z",
    "endDate": "2024-12-08T12:58:17.636Z",
    "autoRenewal": "1",
    "cycle": "Year",
    "amount": "200EUR"
  },
  "planDataMod": {
    "bandwidth": "30Mbps",
    "trafficVol": "1TB/Month",
    "trafficType": "2",
    "IPv4": "1",
    "IPv6": "1",
    "networkRoute": "4837",
    "extra": "Einstein"
  }
}
配置字段说明
账单信息
billingDataMod:startDate:账单起始日期(ISO 时间格式)。endDate:账单结束日期(ISO 时间格式)。autoRenewal:自动续费状态,1表示启用。cycle:账单周期(如月、年)。amount:账单金额及货币单位。
流量和网络配置
planDataMod:bandwidth:服务器带宽信息。trafficVol:流量配额及周期。trafficType:流量类型,1表示入站,2表示双向。IPv4/IPv6:支持的 IPv4 或 IPv6 地址数量。networkRoute:网络路由信息(如 AS4837)。extra:额外备注字段,可用于填写其他信息。
TIP
使用工具轻松配置
如果您不熟悉 JSON 配置规则,可以使用以下第三方公开备注生成器快速生成配置: 公开备注生成器将生成的 JSON 复制到 Dashboard 对应的公开备注设置中,保存后即可在面板前台展示相关信息。
总结
到此已经基本完成了哪吒监控平时所用到的功能,但是还有很多的功能没有展示,具体可以参考官方文档。
参考资料:
官方文档:https://nezha.wiki/
自定义代码:https://nezhadash-docs.buycoffee.top/custom-code
评论区